No edit summary |
|||
| (30 intermediate revisions by 8 users not shown) | |||
| Line 9: | Line 9: | ||
|tab2=Events |
|tab2=Events |
||
}} |
}} |
||
| + | |||
| − | The following is a list of missions in the game [[Futurama: Worlds of Tomorrow]]. Paths are listed from left to right, top to bottom on the map. |
||
| + | == Overview == |
||
| + | '''{{PAGENAME}}''' are available in each of the [[planets]] floating above NNY in the game [[{{Gamename}}]]. Players can send teams of characters on missions to complete [[goals]], unlock districts and gain rewards. Planets and objects containing new space missions will appear in space as players progress along the main storyline and as limited time [[events]] are released. |
||
| + | [[File:planet map.png|800px]] |
||
== Main Storyline == |
== Main Storyline == |
||
| Line 156: | Line 159: | ||
[[Fry]] |
[[Fry]] |
||
|{{Icons|LaBarbara|25px}}24, {{Icons|H. G. Blob|25px}}24, {{icons|captain|25px}}25 |
|{{Icons|LaBarbara|25px}}24, {{Icons|H. G. Blob|25px}}24, {{icons|captain|25px}}25 |
||
| − | |39 |
+ | |39-41 |
|<div class="mw-collapsible mw-collapsed" data-expandtext="Show Map" data-collapsetext="Close"><div class="mw-collapsible-content">[[File:Map_The_Femputer_of_Oz.jpeg|500x500px]]</div></div> |
|<div class="mw-collapsible mw-collapsed" data-expandtext="Show Map" data-collapsetext="Close"><div class="mw-collapsible-content">[[File:Map_The_Femputer_of_Oz.jpeg|500x500px]]</div></div> |
||
| ⚫ | |||
| − | |||
| ⚫ | |||
| ⚫ | |||
| ⚫ | |||
| ⚫ | |||
|- |
|- |
||
| − | | rowspan=" |
+ | | rowspan="9" width="125px" |[[Decapod 10]][[File:Planet Decapod 10.png|right|75px]] |
| + | |[[Beach Day]] |
||
| ⚫ | |||
| + | | |
||
| ⚫ | |||
| + | |{{Icons|H. G. Blob|25px}}33, {{Icons|LaBarbara|25px}}37, {{Icons|Amazonian Amy|25px}}39 |
||
| + | |38-43 |
||
| + | |<div class="mw-collapsible mw-collapsed" data-expandtext="Show Map" data-collapsetext="Close"><div class="mw-collapsible-content">[[File:Decapod 10 Beach Day.png|500px]]</div></div> |
||
| + | |- |
||
| + | |[[Dried Out]] |
||
| + | |[[Zoidberg]] |
||
| + | |{{Icons|H. G. Blob|25px}}35, {{Icons|LaBarbara|25px}}39, {{Icons|Amazonian Amy|25px}}41 |
||
| + | |35-45 |
||
| + | |<div class="mw-collapsible mw-collapsed" data-expandtext="Show Map" data-collapsetext="Close"><div class="mw-collapsible-content">[[File:Decapod 10 Dried Out.png|500px]]</div></div> |
||
| + | |- |
||
| + | |[[Overexposed]] |
||
| + | | |
||
| + | |{{Icons|Zoidberg|25px}}37, 41, 43 |
||
| + | |35-50 |
||
| + | |<div class="mw-collapsible mw-collapsed" data-expandtext="Show Map" data-collapsetext="Close"><div class="mw-collapsible-content">[[File:Decapod 10 Overexposed.png|500px]]</div></div> |
||
| + | |- |
||
| + | |[[Artifact In the Rough]] |
||
| + | |[[Fry]] |
||
| + | |{{Icons|Nude Professor|25px}}39, 43, {{Icons|Zoidberg|25px}}45 |
||
| + | |35-50 |
||
| + | |<div class="mw-collapsible mw-collapsed" data-expandtext="Show Map" data-collapsetext="Close"><div class="mw-collapsible-content">[[File:Decapod 10 Artifact In the Rough.png|500px]]</div></div> |
||
| + | |- |
||
| + | |[[Tasting Menu]] |
||
| + | | |
||
| + | |{{Icons|Elzar|25px}}41, 45, {{Icons|Zoidberg|25px}}47 |
||
| + | |38-44 |
||
| + | |<div class="mw-collapsible mw-collapsed" data-expandtext="Show Map" data-collapsetext="Close"><div class="mw-collapsible-content">[[File:Decapod 10 Tasting Menu.png|500px]]</div></div> |
||
| + | |- |
||
| + | |[[All Gloom, No Doom]] |
||
| + | |[[The Professor]] |
||
| + | |{{Icons|Elzar|25px}}43, {{Icons|Nude Professor|25px}}47, {{Icons|Zoidberg|25px}}49 |
||
| + | |34-43 |
||
| + | |<div class="mw-collapsible mw-collapsed" data-expandtext="Show Map" data-collapsetext="Close"><div class="mw-collapsible-content">[[File:Decapod 10 All Gloom, No Doom.png|500px]]</div></div> |
||
| + | |- |
||
| + | |[[Feeling Crabby]] |
||
| + | | |
||
| + | |{{Icons|Leela|25px}}52, {{icons|captain|25px}}55, {{icons|scientist|25px}}58 |
||
| + | | |
||
| + | |<div class="mw-collapsible mw-collapsed" data-expandtext="Show Map" data-collapsetext="Close"><div class="mw-collapsible-content">[[File:Decapod 10 Feeling Crabby.png|500px]]</div></div> |
||
| + | |- |
||
| + | |[[Being Shellfish]] |
||
| + | | |
||
| + | |{{Icons|Zoidberg|25px}}53, {{icons|influencer|25px}}56, {{icons|delivery boy|25px}}58 |
||
| + | | |
||
| + | |<div class="mw-collapsible mw-collapsed" data-expandtext="Show Map" data-collapsetext="Close"><div class="mw-collapsible-content">[[File:Decapod 10 Being Shellfish.png|500px]]</div></div> |
||
| + | |- |
||
| + | |[[Bobbin' for Lobsters]] |
||
| + | |[[Igner]] |
||
| + | |{{icons|robot|25px}}54, {{icons|villain|25px}}57, {{icons|Hermes|25px}}60 |
||
| + | |42–43 |
||
| + | |<div class="mw-collapsible mw-collapsed" data-expandtext="Show Map" data-collapsetext="Close"><div class="mw-collapsible-content">[[File:Decapod 10 Bobbin' for Lobsters.png|500px]] |
||
| + | |- |
||
| + | | rowspan="12" width="125px" |[[Amphibios 9]][[File:Planet Amphibios 9.png|right|75px]] |
||
| + | |[[Drain The Swamp]]<!-- Do not fix title case please --> |
||
| + | | |
||
| + | |{{icons|scientist|25px}}55, {{icons|influencer|25px}}58, {{icons|Amy|25px}}61 |
||
| + | | |
||
| + | |<div class="mw-collapsible mw-collapsed" data-expandtext="Show Map" data-collapsetext="Close"><div class="mw-collapsible-content">[[File:Amphibios 9 Drain the Swamp.png|500px]]</div> |
||
| + | |- |
||
| + | |[[Hot and Humid]] |
||
| + | | |
||
| + | |{{icons|The Professor|25px}}56, {{icons|Captain|25px}}59, {{icons|delivery boy|25px}}62 |
||
| + | | |
||
| + | |<div class="mw-collapsible mw-collapsed" data-expandtext="Show Map" data-collapsetext="Close"><div class="mw-collapsible-content">[[File:Amphibios 9 Hot and Humid.png|500px]]</div> |
||
| + | |- |
||
| + | |[[Buzzin' Around]] |
||
| + | | |
||
| + | |{{icons|scientist|25px}}57, {{icons|Fry|25px}}60. {{icons|robot|25px}}63 |
||
| + | | |
||
| + | |<div class="mw-collapsible mw-collapsed" data-expandtext="Show Map" data-collapsetext="Close"><div class="mw-collapsible-content">[[File:Amphibios 9 Buzzin' Around.png|500px]]</div> |
||
| + | |- |
||
| + | |[[Muddy Waters]] |
||
| + | |[[Larry]] |
||
| + | |{{icons|robot|25px}}58, {{icons|Kif|25px}}61, {{icons|villain|25px}}64 |
||
| + | | |
||
| + | |<div class="mw-collapsible mw-collapsed" data-expandtext="Show Map" data-collapsetext="Close"><div class="mw-collapsible-content">[[File:Amphibios 9 Muddy Waters.png|500px]]</div> |
||
| + | |- |
||
| + | |[[Mudbound and Down]] |
||
| + | | |
||
| + | |{{icons|influencer|25px}}59, {{icons|Bender|25px}}62, {{icons|delivery boy|25px}}65 |
||
| + | | |
||
| + | |<div class="mw-collapsible mw-collapsed" data-expandtext="Show Map" data-collapsetext="Close"><div class="mw-collapsible-content">[[File:Amphibios 9 Mudbound and Down.png|500px]]</div> |
||
| + | |- |
||
| + | |[[Swimming in the Cesspool]] |
||
| + | | |
||
| + | |{{icons|Zoidberg|25px}}60, {{icons|robot|25px}}63, {{icons|Leela|25px}}66 |
||
| + | | |
||
| + | |<div class="mw-collapsible mw-collapsed" data-expandtext="Show Map" data-collapsetext="Close"><div class="mw-collapsible-content">[[File:Amphibios 9 Swimming in the Cesspool.png|500px]]</div> |
||
| + | |- |
||
| + | |[[Muggy and Buggy]] |
||
| + | |[[Walt]] |
||
| + | |{{icons|Fry|25px}}61, {{icons|The Professor|25px}}64, {{icons|Bender|25px}}67 |
||
| + | | |
||
| + | |<div class="mw-collapsible mw-collapsed" data-expandtext="Show Map" data-collapsetext="Close"><div class="mw-collapsible-content">[[File:Amphibios 9 Muggy and Buggy.png|500px]]</div> |
||
| + | |- |
||
| + | |[[By the Sweat of Your Brow]] |
||
| + | |[[Igner]], [[Larry]], [[Walt]] |
||
| + | |{{icons|Kif|25px}}62, {{icons|Hermes|25px}}65, {{icons|Amy|25px}}68 |
||
| + | | |
||
| + | |<div class="mw-collapsible mw-collapsed" data-expandtext="Show Map" data-collapsetext="Close"><div class="mw-collapsible-content">[[File:Amphibios 9 By the Sweat of Your Brow.png|500px]]</div> |
||
| + | |- |
||
| + | |[[The Cool Down]] |
||
| + | |[[Igner]], [[Larry]], [[Walt]] |
||
| + | |{{icons|robot|25px}}63, {{icons|captain|25px}}66, {{icons|scientist|25px}}69 |
||
| + | | |
||
| + | |<div class="mw-collapsible mw-collapsed" data-expandtext="Show Map" data-collapsetext="Close"><div class="mw-collapsible-content">[[File:Amphibios 9 The Cool Down.png|500px]]</div> |
||
| + | |- |
||
| + | |[[Airing It Out]] |
||
| + | |[[Igner]], [[Larry]], [[Walt]] |
||
| + | |{{icons|delivery boy|25px}}65, {{icons|influencer|25px}}67, {{icons|scientist|25px}}70 |
||
| + | | |
||
| + | |<div class="mw-collapsible mw-collapsed" data-expandtext="Show Map" data-collapsetext="Close"><div class="mw-collapsible-content">[[File:Amphibios 9 Airing It Out.png|500px]]</div> |
||
| + | |- |
||
| + | |[[Aspire to Perspire]] |
||
| + | |[[Igner]], [[Larry]], [[Walt]] |
||
| + | |{{icons|captain|25px}}65, {{icons|robot|25px}}68, {{icons|scientist|25px}}71 |
||
| + | | |
||
| + | |<div class="mw-collapsible mw-collapsed" data-expandtext="Show Map" data-collapsetext="Close"><div class="mw-collapsible-content">[[File:Amphibios 9 Aspire To Perspire.png|500px]]</div> |
||
| + | |- |
||
| + | |[[Tropical Nightmare]] |
||
| + | |[[Igner]], [[Larry]], [[Walt]] |
||
| + | |{{icons|delivery boy|25px}}66, {{icons|influencer|25px}}69, {{icons|captain|25px}}72 |
||
| + | | |
||
| + | |<div class="mw-collapsible mw-collapsed" data-expandtext="Show Map" data-collapsetext="Close"><div class="mw-collapsible-content">[[File:Amphibios 9 Tropical Nightmare.png|500px]]</div> |
||
|} |
|} |
||
== Daily Missions == |
== Daily Missions == |
||
| − | {| class="wikitable" |
+ | {| class="wikitable" style="width: 100%" |
!Planet |
!Planet |
||
| − | !Day !! Mission !! |
+ | !Day !! Mission !! Rewards !! Path Locks !! Fuel Costs !! Map |
|- |
|- |
||
| − | | rowspan=" |
+ | | rowspan="24" width="125px" |[[The Daily Planet]][[File:The Daily Planet.png|right|75px]] |
| − | | All || [[Earning Your Stars]] || |
+ | | All || [[Earning Your Stars]] || [[File:Badge Career 2 Star.png|20px]] || {{icons|scientist}}20 || 8/9 |
|<div class="mw-collapsible mw-collapsed" data-expandtext="Show Map" data-collapsetext="Close">[[File:Mission Earning Your Stars.png|frameless|600px]]</div> |
|<div class="mw-collapsible mw-collapsed" data-expandtext="Show Map" data-collapsetext="Close">[[File:Mission Earning Your Stars.png|frameless|600px]]</div> |
||
|- |
|- |
||
| − | | All || [[Promotion Track]] || |
+ | | All || [[Promotion Track]] || [[File:Badge Career 3 Star.png|20px]] || {{icons|captain}}45 || 20/24 |
|<div class="mw-collapsible mw-collapsed" data-expandtext="Show Map" data-collapsetext="Close">[[File:Mission Promotion Track.png|frameless|600px]]</div> |
|<div class="mw-collapsible mw-collapsed" data-expandtext="Show Map" data-collapsetext="Close">[[File:Mission Promotion Track.png|frameless|600px]]</div> |
||
|- |
|- |
||
| − | | All || [[Chain of Command]] || |
+ | | All || [[Chain of Command]] || [[File:Badge Career 4 Star.png|20px]] || {{icons|delivery boy}}80 || 30/36 |
| + | |<div class="mw-collapsible mw-collapsed" data-expandtext="Show Map" data-collapsetext="Close">[[File:Mission Chain of Command.png|frameless|600px]]</div> |
||
|- |
|- |
||
| + | |rowspan="2"|[[Monday]] |
||
| − | |[[Sunday]] || || || || || |
||
| + | | [[Fact-Based Results]] || [[File:Badge Scientist 2 Star.png|20px]] || {{icons|scientist}}45 || 20/24 |
||
| + | |<div class="mw-collapsible mw-collapsed" data-expandtext="Show Map" data-collapsetext="Close">[[File:Daily Fact-Based Results.png|frameless|600px]]</div> |
||
|- |
|- |
||
| + | | [[Smart Cookie]] || [[File:Badge Scientist 3 Star.png|20px]] || {{icons|scientist}}80 || 30/36 |
||
| − | |[[Monday]] || || || || || |
||
| + | |<div class="mw-collapsible mw-collapsed" data-expandtext="Show Map" data-collapsetext="Close">[[File:Daily Smart Cookie.png|frameless|600px]]</div> |
||
|- |
|- |
||
| − | |[[Tuesday]] |
+ | |rowspan="2"|[[Tuesday]] |
| + | | [[Captain's Orders]] || [[File:Badge Captain 2 Star.png|20px]] || {{icons|captain}}45 || 20/24 |
||
| + | |<div class="mw-collapsible mw-collapsed" data-expandtext="Show Map" data-collapsetext="Close">[[File:Daily Captain's Orders.png|frameless|600px]]</div> |
||
|- |
|- |
||
| + | | [[Leadership Quality]] || [[File:Badge Captain 3 Star.png|20px]] || {{icons|captain}}80 || 30/36 |
||
| − | |[[Wednesday]] || || || || || |
||
| + | |<div class="mw-collapsible mw-collapsed" data-expandtext="Show Map" data-collapsetext="Close">[[File:Daily Leadership Quality.png|frameless|600px]]</div> |
||
|- |
|- |
||
| + | |rowspan="2"|[[Wednesday]] |
||
| − | |[[Thursday]] || || || || || |
||
| + | | [[Marketing Master]] || [[File:Badge Influencer 2 Star.png|20px]] || {{icons|influencer}}45 || 20/24 |
||
| + | |<div class="mw-collapsible mw-collapsed" data-expandtext="Show Map" data-collapsetext="Close">[[File:Daily Marketing Master.png|frameless|600px]]</div> |
||
|- |
|- |
||
| + | |||
| − | |[[Friday]] || || || || || |
||
| + | | [[Word of Mouth]] || [[File:Badge Influencer 3 Star.png|20px]] || {{icons|influencer}}80 || 30/36 |
||
| + | |<div class="mw-collapsible mw-collapsed" data-expandtext="Show Map" data-collapsetext="Close">[[File:Daily Word of Mouth.png|frameless|600px]]</div> |
||
|- |
|- |
||
| + | |rowspan="2"|[[Thursday]] |
||
| − | |[[Saturday]] || || || || || |
||
| + | | [[Upgrade It]] || [[File:Badge Robot 2 Star.png|20px]] || {{icons|robot}}45 || 20/24 |
||
| + | |<div class="mw-collapsible mw-collapsed" data-expandtext="Show Map" data-collapsetext="Close">[[File:Daily Upgrade It.png|frameless|600px]]</div> |
||
| + | |- |
||
| + | | [[Reinforced Steel]] || [[File:Badge Robot 3 Star.png|20px]] || {{icons|robot}}80 || 30/36 |
||
| + | |<div class="mw-collapsible mw-collapsed" data-expandtext="Show Map" data-collapsetext="Close">[[File:Daily Reinforced Steel.png|frameless|600px]]</div> |
||
| + | |- |
||
| + | |rowspan="2"|[[Friday]] |
||
| + | | [[Deliver With Care]] || [[File:Badge Delivery Boy 2 Star.png|20px]] || {{icons|delivery boy}}45 || 20/24 |
||
| + | |<div class="mw-collapsible mw-collapsed" data-expandtext="Show Map" data-collapsetext="Close">[[File:Daily Deliver With Care.png|frameless|600px]]</div> |
||
| + | |- |
||
| + | | [[Speed Run]] || [[File:Badge Delivery Boy 3 Star.png|20px]] || {{icons|delivery boy}}80 || 30/36 |
||
| + | |<div class="mw-collapsible mw-collapsed" data-expandtext="Show Map" data-collapsetext="Close">[[File:Daily Speed Run.png|frameless|600px]]</div> |
||
| + | |- |
||
| + | |rowspan="5"|[[Saturday]] |
||
| + | | [[Looking Evil In the Eye]] || [[File:Badge Villain 2 Star.png|20px]] || {{icons|villain}}45 || 20/24 |
||
| + | |<div class="mw-collapsible mw-collapsed" data-expandtext="Show Map" data-collapsetext="Close">[[File:Daily Looking Evil In the Eye.png|frameless|600px]]</div> |
||
| + | |- |
||
| + | | [[Chillin' Like a Villain]] || [[File:Badge Villain 3 Star.png|20px]] || {{icons|villain}}80 || 30/36 |
||
| + | |<div class="mw-collapsible mw-collapsed" data-expandtext="Show Map" data-collapsetext="Close">[[File:Daily Chillin' Like a Villain.png|frameless|600px]]</div> |
||
| + | |- |
||
| + | | [[Stellar Review]] || {{icons|job tera}} || {{icons|scientist}}20 || 8/9 |
||
| + | |<div class="mw-collapsible mw-collapsed" data-expandtext="Show Map" data-collapsetext="Close">[[File:Daily Stellar Review.png|frameless|600px]]</div> |
||
| + | |- |
||
| + | | [[Skills Assessment]] || {{icons|job peta}} || {{icons|scientist}}45 || 20/24 |
||
| + | |<div class="mw-collapsible mw-collapsed" data-expandtext="Show Map" data-collapsetext="Close">[[File:Daily Skills Assessment.png|frameless|600px]]</div> |
||
| + | |- |
||
| + | | [[Standout Candidate]] || {{icons|job peta}} || {{icons|scientist}}80 || 30/36 |
||
| + | |<div class="mw-collapsible mw-collapsed" data-expandtext="Show Map" data-collapsetext="Close">[[File:Daily Standout Candidate.png|frameless|600px]]</div> |
||
| + | |- |
||
| + | |rowspan="3"|[[Sunday]] |
||
| + | | [[Holler for a Dollar]] || [[File:Currency Nixonbucks.png|20px]] || {{icons|delivery boy}}20 || 8/9 |
||
| + | |<div class="mw-collapsible mw-collapsed" data-expandtext="Show Map" data-collapsetext="Close">[[File:Daily Holler for a Dollar.png|frameless|600px]]</div> |
||
| + | |- |
||
| + | | [[Spoiled Rotten]] || [[File:Currency Nixonbucks.png|20px]] || {{icons|delivery boy}}45 || 20/24 |
||
| + | |<div class="mw-collapsible mw-collapsed" data-expandtext="Show Map" data-collapsetext="Close">[[File:Daily Spoiled Rotten.png|frameless|600px]]</div> |
||
| + | |- |
||
| + | | [[Richie Rich]] || [[File:Currency Nixonbucks.png|20px]] || {{icons|delivery boy}}80 || 30/36 |
||
| + | |<div class="mw-collapsible mw-collapsed" data-expandtext="Show Map" data-collapsetext="Close">[[File:Daily Richie Rich.png|frameless|600px]]</div> |
||
| ⚫ | |||
| + | |||
| ⚫ | |||
| ⚫ | |||
| ⚫ | |||
| ⚫ | |||
| + | |- |
||
| + | | rowspan="1" width="125px" |[[Osiris 4]][[File:Osiris 4.jpg|right|75px]] |
||
| ⚫ | |||
| ⚫ | |||
|} |
|} |
||
==See also== |
==See also== |
||
| ⚫ | |||
*[[Planets]] |
*[[Planets]] |
||
| ⚫ | |||
| − | *[[Events]] |
||
[[Category:Missions]] |
[[Category:Missions]] |
||
Latest revision as of 18:25, 15 August 2019
Missions
Overview[ | ]
Missions are available in each of the planets floating above NNY in the game Futurama: Worlds of Tomorrow. Players can send teams of characters on missions to complete goals, unlock districts and gain rewards. Planets and objects containing new space missions will appear in space as players progress along the main storyline and as limited time events are released.

Main Storyline[ | ]


Daily Missions[ | ]
| Planet | Day | Mission | Rewards | Path Locks | Fuel Costs | Map |
|---|---|---|---|---|---|---|
The Daily Planet |
All | Earning Your Stars | 8/9 |  | ||
| All | Promotion Track | 20/24 |  | |||
| All | Chain of Command | 30/36 |  | |||
| Monday | Fact-Based Results | 20/24 |  | |||
| Smart Cookie | 30/36 |  | ||||
| Tuesday | Captain's Orders | 20/24 |  | |||
| Leadership Quality | 30/36 |  | ||||
| Wednesday | Marketing Master | 20/24 |  | |||
| Word of Mouth | 30/36 |  | ||||
| Thursday | Upgrade It | 20/24 |  | |||
| Reinforced Steel | 30/36 |  | ||||
| Friday | Deliver With Care | 20/24 |  | |||
| Speed Run | 30/36 |  | ||||
| Saturday | Looking Evil In the Eye | 20/24 |  | |||
| Chillin' Like a Villain | 30/36 |  | ||||
| Stellar Review | 8/9 |  | ||||
| Skills Assessment | 20/24 | 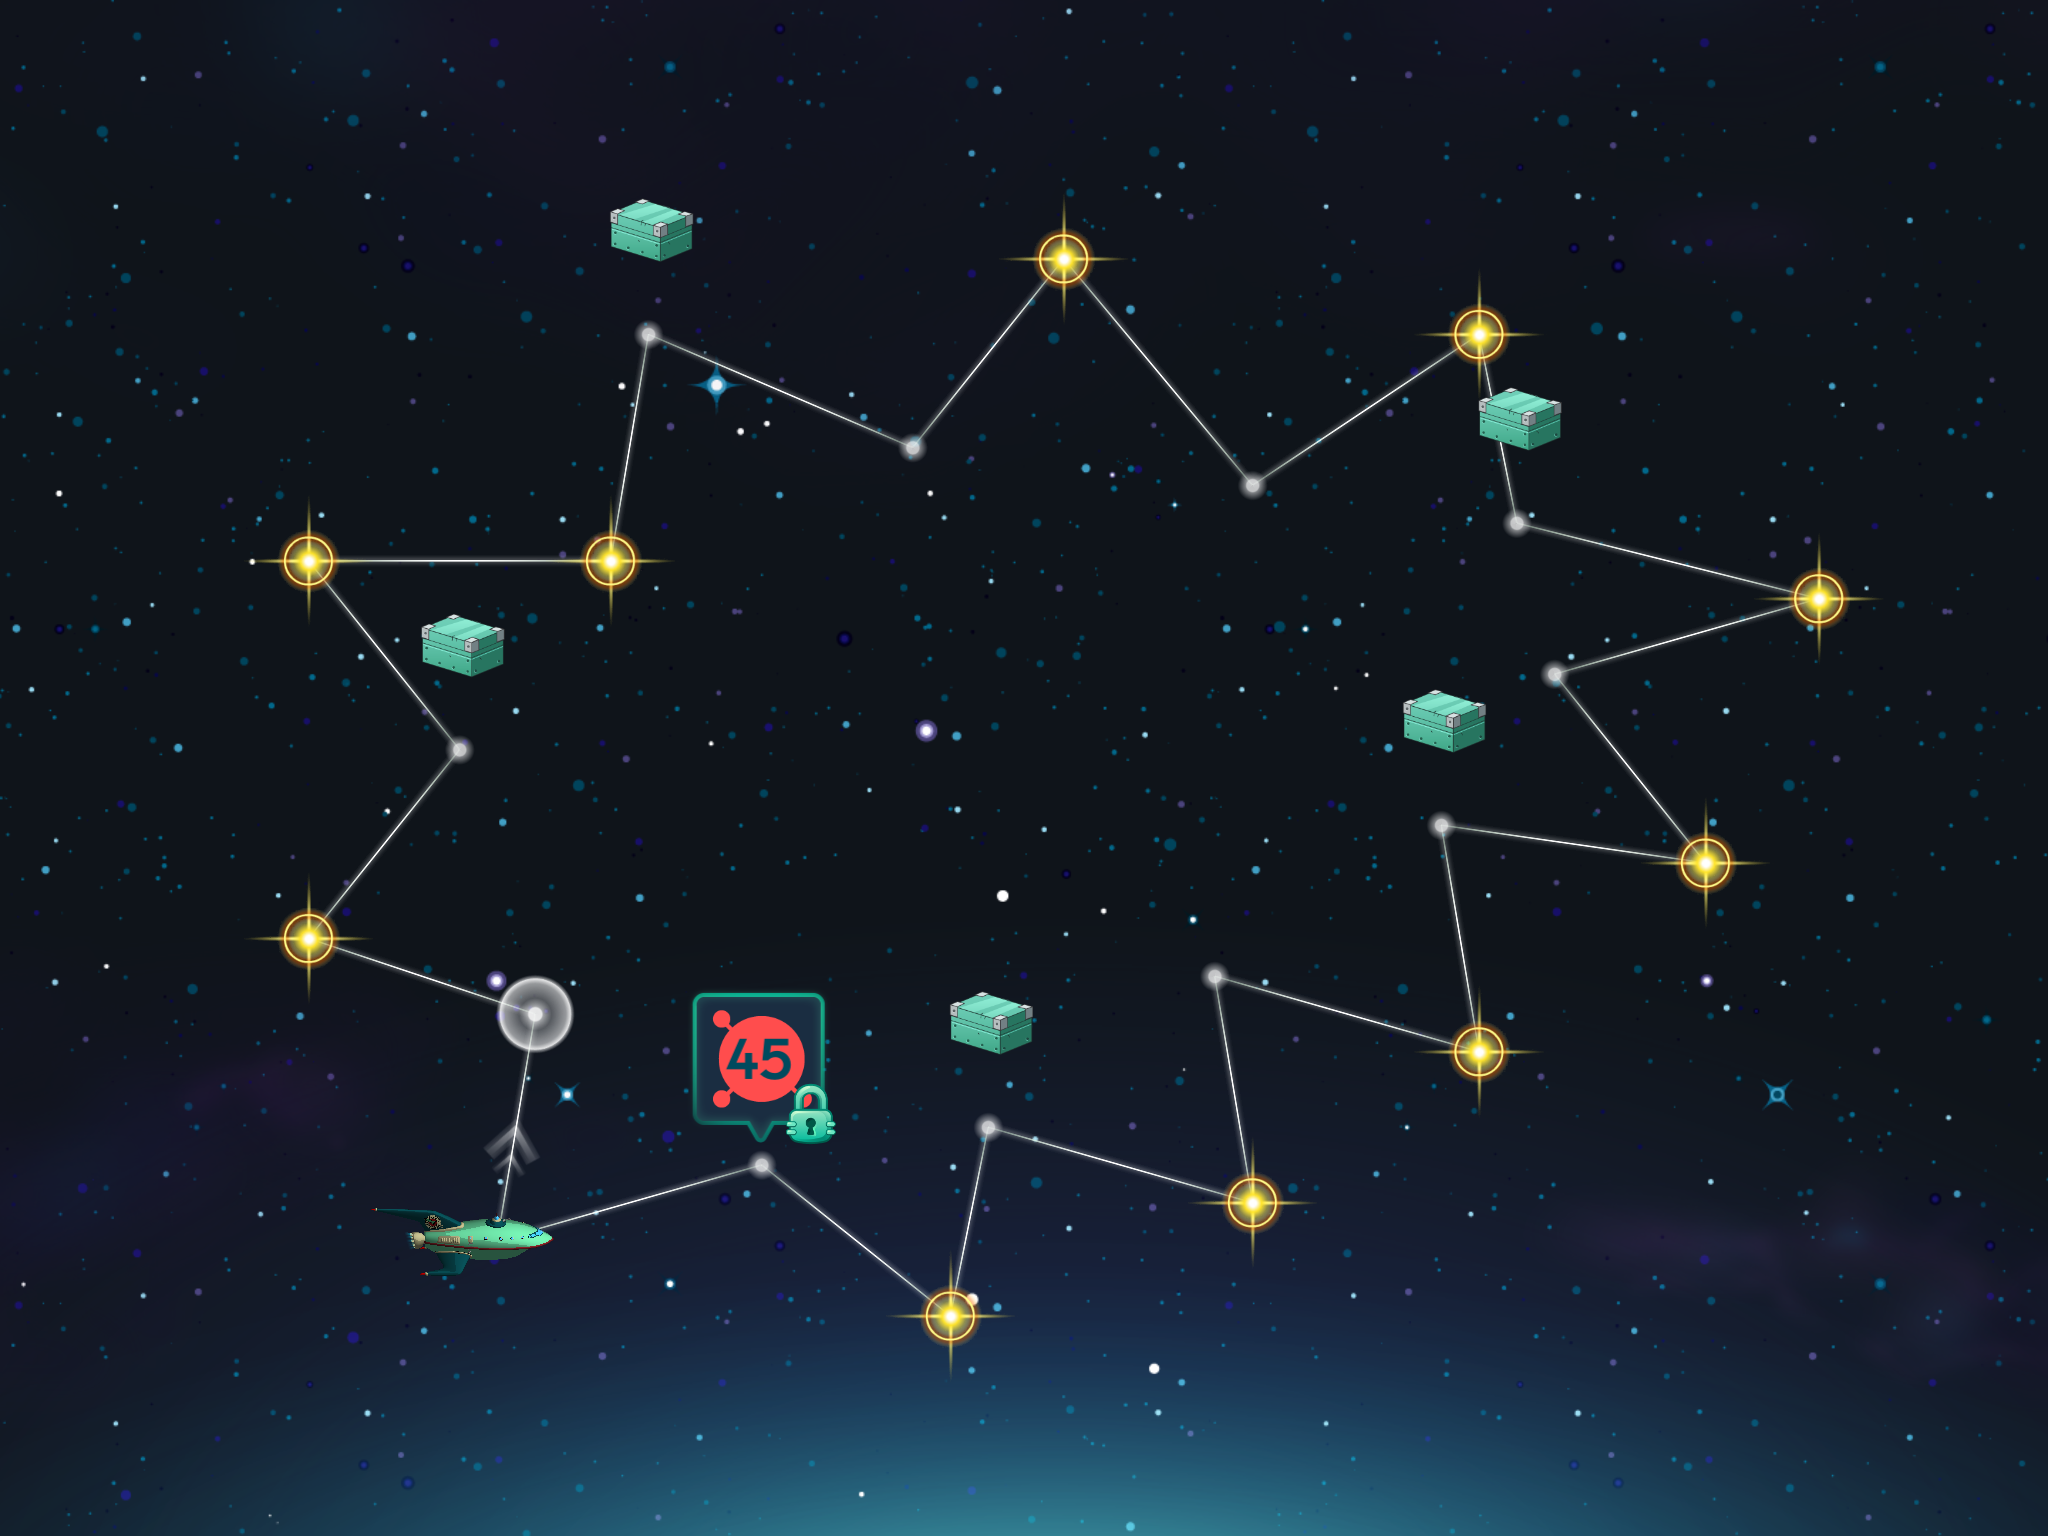 | ||||
| Standout Candidate | 30/36 |  | ||||
| Sunday | Holler for a Dollar | 8/9 |  | |||
| Spoiled Rotten | 20/24 |  | ||||
| Richie Rich | 30/36 |  |
iOS Exclusive[ | ]
| Planet | Mission | Required Character(s) | Path Locks | Fuel Costs | Map |
|---|---|---|---|---|---|
Osiris 4 |
Worship Tour 3017 | Pharaoh Bender | 16/13/16 | 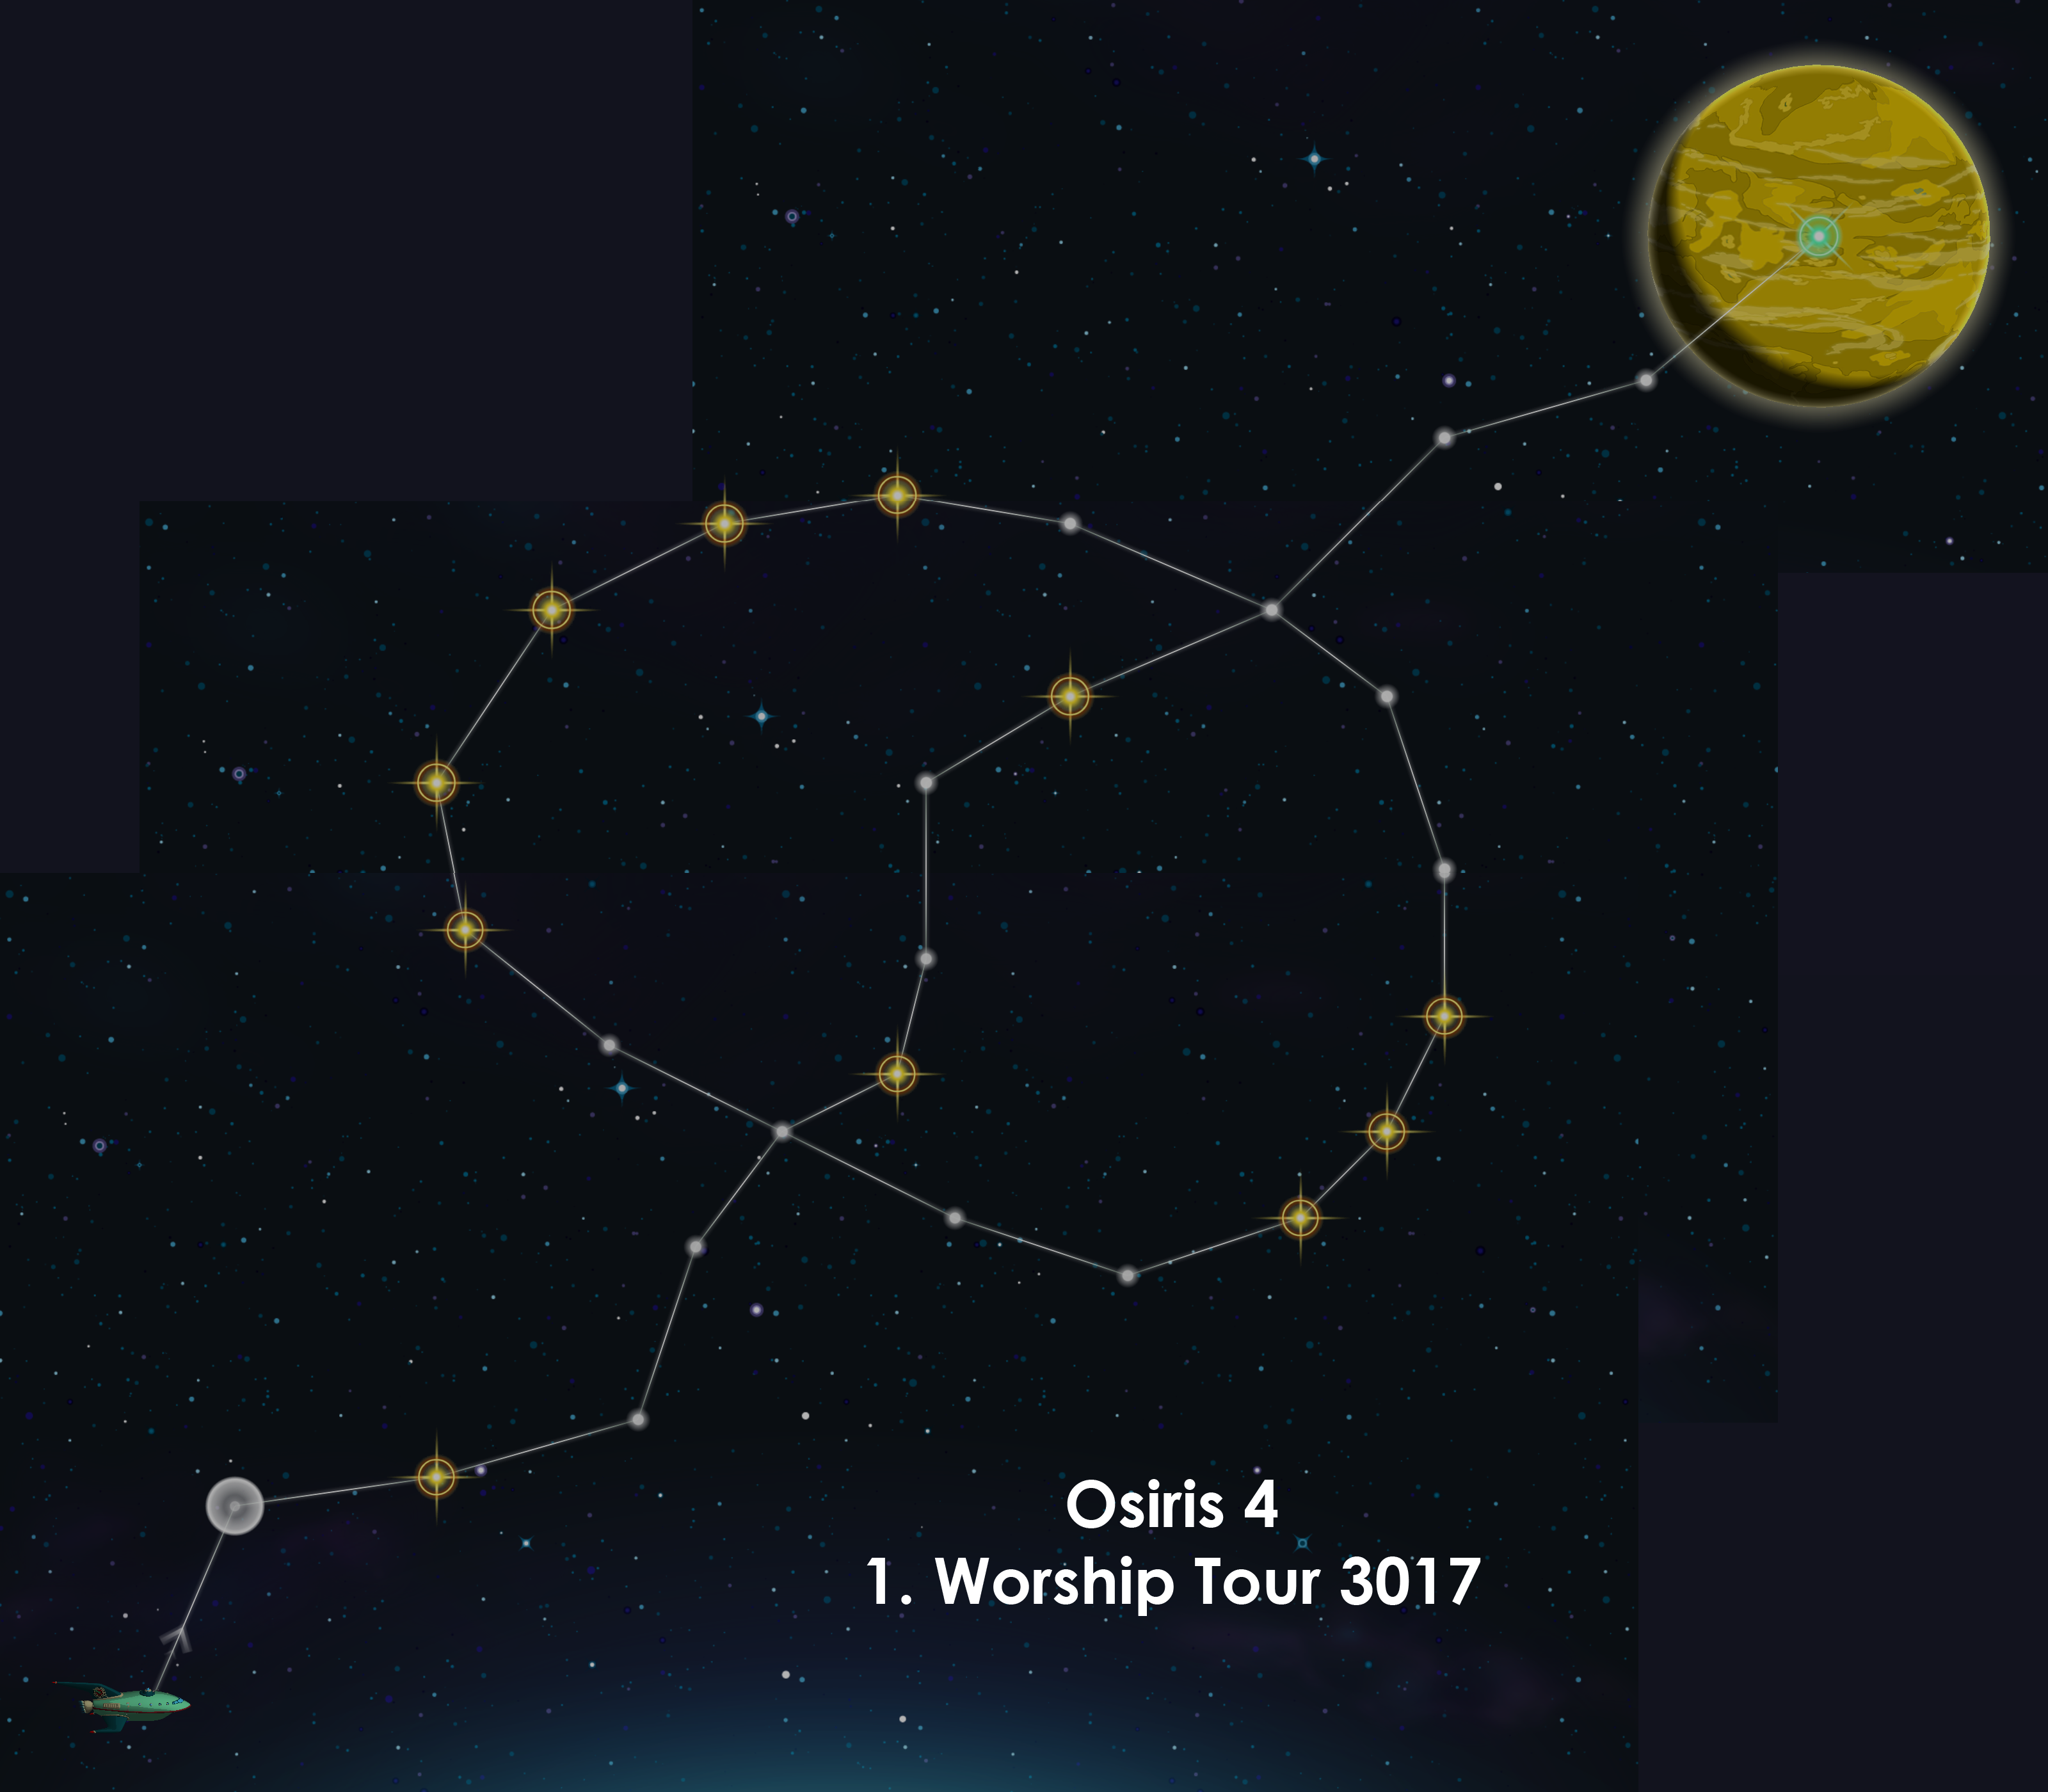 |
See also[ | ]